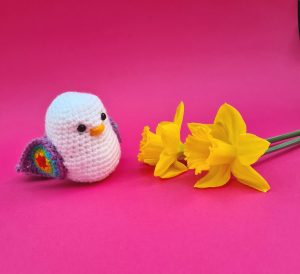
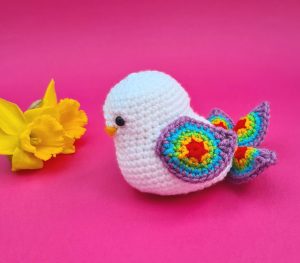
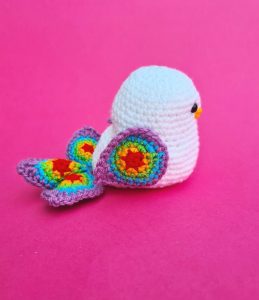
I had this little bird in my head for a few weeks now. I wanted to design something to mark the last 12 months of the pandemic that the whole world has been through and continues to challenge us in so many ways. My Little Bird of Hope represents looking forward to a brighter future where we can all give our friends and family a hug and sit down to talk and laugh and share our experiences together.
I hope you enjoy making my Little Bird of Hope.
Size: 4 inches.
Materials:
- hook: US G (4.00 mm)
- yarn: DK acrylic yarn. I used Hayfield Bonus DK but any double knit can be used; (Bird Body: white; Bird Wings/Tail: red/yellow/green/blue/purple; Beak: yellow)
- stitch marker
- tapestry needle
- safety eyes 7mm (embroidered eyes can be made as an alternative)
- toy stuffing
Gauge: This pattern does not require a specific gauge.
Skill Level: Easy
Notes: Pattern is worked in continuous rounds; do not join at the end of rounds.
Abbreviations used: (US terms)
- ch: chain stitch
- dc: double crochet (UK terms: treble crochet)
- hdc: half double crochet (UK terms: half treble crochet)
- mc: magic circle
- picot: picot stitch
- sc: single crochet (UK terms: double crochet)
- sc2tog: single crochet 2 stitches together
- sk: skip stitch
- st(s): stitch(es)
- yo: yarn over
Stitch Explanation:
dc: Yarn over and insert your hook into the stitch or space indicated, yarn over and pull up a loop. (You should have 3 loops on your hook.) Yarn over, draw through 2 loops, yarn over again and draw through remaining two loops on the hook.
hdc Yarn over and insert your hook into the stitch or space indicated, yarn over and pull up a loop. (You should have 3 loops on your hook.) Yarn over again and draw through all three of the loops on the hook.
mc make a loop with the yarn, leaving a tail around 10cm long. Make sure the tail end is on the left hand side. Insert your hook into the loop, from front to back. Wrap the working yarn around the hook and pull the yarn through the loop, chain 1. Your first round of stitches will then be worked into the loop. Once you’ve worked the number of stitches you need into the loop, simply pull the tail end of the yarn to draw up and close the loop – magic! (An alternative to the mc is to chain 3 and join with a sl st to first chain, then work first round of stitches into loop created.)
picot chain two, sl st into 2nd chain from hook.
sl st Insert hook into stitch indicated, wrap yarn over hook, draw the yarn through the chain and the loop in one movement.
sc Insert your hook into the stitch or space indicated, yarn over and pull up a loop. (You should have two loops on your hook). Yarn over and draw through both of the loops on your hook
sc2tog Insert hook in next stitch, draw up a loop, (two loops on hook), insert hook in next stitch, draw up a loop (3 loops on hook), YO and draw through all 3 loops.
PATTERN INSTRUCTIONS
Bird Body (with white yarn)
- Round 1: mc, 6sc in circle (6)
- Round 2: 2sc in each st (12)
- Round 3: *2sc in first st, sc in next*, repeat between ** to end of round (18)
- Round 4: *2sc in first st, sc in next 2 sts*, repeat between ** to end of round (24)
- Round 5: *2sc in first st, sc in next 3 sts*, repeat between ** to end of round (30)
- Round 6-8: sc in each st around (30)
- Round 9: *2sc in first st, sc in next 4 sts*, repeat between ** to end of round (36)
- Round 10-12: sc in each st around 36)
- Round 13: *2sc in first st, sc in next 5 sts*, repeat between ** to end of round (42)
- Round 14-20: sc in each st around (42)
- Round 21: sc2tog six times, sc in remaining sts (36)
- Round 22: sc2tog six times, sc in remaining sts (30)
- Round 23: *sc2tog, sc in next 3 sts*, repeat between ** to end of round (24)
At this stage, place your safety eyes between Rounds 8 and 9, 6 sts apart. (making sure that the eyes are placed at the front of the bird – the same side as your decreases on rounds 21 and 22.
Start filling your bird with toy stuffing at this stage.
- Round 24: *sc2tog, sc in next 2 sts*, repeat between ** to end of round (18)
- Round 25: *sc2tog, sc in next*, repeat between ** to end of round (12)
- Round 26: sc2tog to end of round (6)
Fasten off, finish filling with toy stuffing and close using tail of yarn.
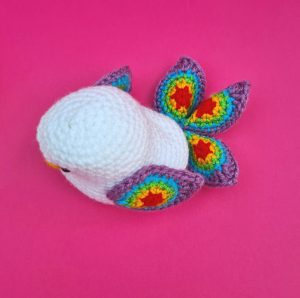
Rainbow Wings (make 5)
Starting with red yarn;
- Round 1: mc, 6sc in circle; change to yellow yarn (6)
- Round 2: 2sc in each st; change to green yarn (12)
- Round 3: *2sc in first st, sc in next*, repeat between ** to end of round; change to blue yarn (18)
- Round 4: *2sc in first st, sc in next 2 sts*, repeat between ** to end of round; change to purple yarn (24)
- Round 5: sc in first 10 sts, hdc in next st, (2dc, picot) in next st, 2dc in next st, hdc in next st, sc in remaining 10 sts. Sl st into first st to finish.
Fasten off
Finishing
- With yellow yarn darn a small beak under eyes at Round 10.
- Attach one wing to each side of bird using picture as guide.
- Attach three wings together at bottom edge (so picot stitch point is at the top). Then attach complete section to back of bird.